Data Migration Façade
Categories:
By David Bastide and Soumya Dutta at Microsoft Development Center Copenhagen
![]()
Context:
This pattern is describing how you can migrate data using the Data Migration Façade.
Problem:
Writing migration code from an external source, such as a product from a competitor, can be time consuming, as you need to tackle the problems of what to migrate, in which order, exception handling… and can result in code that is fragile due to deep dependencies on the NAV data model (high coupling). Any change to the NAV data model can easily break this code.
Solution:
The idea of the Data Migration Façade is to provide an API that creates and updates master data and related entities (including transactions) without referencing NAV tables.
Additionally, the framework around the Data Migration Façade provides tools for error handling, and a way to integrate the migration in the Data Migration Overview page (page 1799).
The façade framework has the following components:
Two management codeunits:
- Data Migration Façade (codeunit 6100): Integrates the extension to the Data Migration Wizard. Starts a migration, or restarts a migration that failed for some records.
- Data Migration Status Facade (codeunit 6101): Initializes and updates the status of the migration. The status displays in the Data Migration Overview page (page 1799).
Several master data migration façade codeunits that create and update entities. Each codeunit also contains events that help ensure that data is created in the correct order:
- GL Acc. Data Migration Façade (codeunit 6110)
- Vendor Data Migration Façade (codeunit 6111)
- Customer Data Migration Façade (codeunit 6112)
- Item Data Migration Façade (codeunit 6113)
- If you want to migrate other entities, it is possible to define your own codeunit that will contain your custom code (see ‘Usage’ below).
A page where you can view the status and progress of the migration. It shows one line for each master data entity (item, customer, vendor, general ledger account) that was chosen for migration. You can also stop a migration by choosing the Stop Migration action.
- Data Migration Overview (page 1799)
Usage:
There are the following use cases:
Migration with staging tables, where data from another product is exported to a file or set of files, and the exported data is then imported to buffer tables, before running the migration logic. In this case, the migration is implemented in your extension codeunits, and it is called through events, one record at a time.
Migration without staging tables, for example, when you migrate data by importing it from an external tool such as external APIs and webservices. In this case, the migration is also implemented in your extension codeunits but it will be called through the OnRun procedure. You will be responsible for looping on the records to migrate, and you must migrate all records in this unique OnRun call for a given entity.
To initialize and start the data migration, you must call the following procedures:
- “Data Migration Status Façade”.InitStatusLine(‘My Migration Type’,Database::Item,42000,0,Codeunit::“My extension Item migration codeunit”)
This deletes existing status lines for migrating Items for ‘My Migration Type’, and initializes a new status line with 0 records migrated out of 42000.
“Data Migration Façade”.StartMigration(‘My Migration Type’,false)
This starts the migration. False means this is not a retry. A re-try is when you migrate one or more records from the Show Errors page, which is described later in this document. Retry = true is only used by the Show Errors page and should not be used from extensions.
Usage without staging tables:
The overall workflow is:
- Integrate your extension in the Data Migration Wizard by subscribing to the events exposed by the Data Migration Façade.
- From there, initialize the status of the migration so it can be displayed in the Data Migration Overview. When initializing the status lines, you provide the codeunit ID that will be called for each entity: “Data Migration Status Façade”.InitStatusLine(‘My Migration Type’,Database::Item,42000,0,Codeunit::“My extension Item migration codeunit”).
- Launch the migration: “Data Migration Façade”.StartMigration(‘My Migration Type’,false).
- Your migration codeunits are called one at a time (OnRun) in the following order:
- G/L accounts (first, because customer/vendor posting groups refer to G/L accounts)
- Customers
- Vendors
- Items (because discounts may refer to customer groups)
- Others
- Loop on all of the records to migrate. You can update the increment of the amount of records migrated: “Data Migration Status Facade”.IncrementStatusLine(‘My Migration Type’,Database::Item,42).
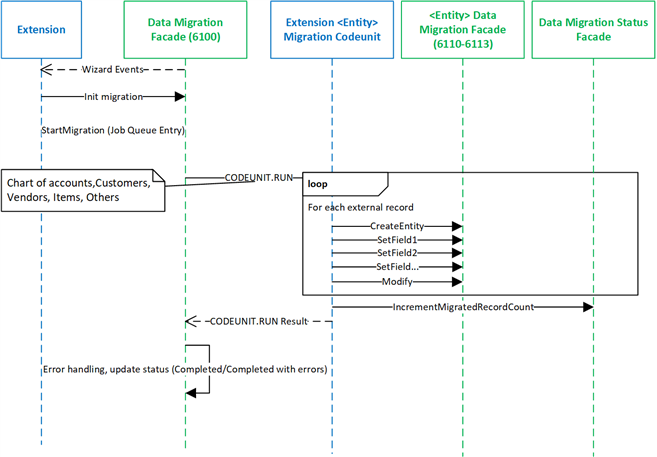
Figure 1: sequence diagram of the data migration without staging tables
The following example shows how to migrate items without staging tables:
trigger OnRun();
var
    ItemDataMigrationFacade: Codeunit "Item Data Migration Facade";
    ItemNumber: Integer;
    ItemJson: Text;
begin
    // loop on items retrieved through a web service for example
    for ItemNumber := 1 to ExternalWebService.GetItemCount do begin
        ExternalWebService.GetItem(ItemNumber,ItemJson);

        // create item using the facade
        if not ItemDataMigrationFacade.CreateItemIfNeeded(ItemJson.ItemNumber,ItemJson.ItemName1,
            ItemJson.ItemName2,ConvertItemType(ItemJson.ItemType)) then
                exit; // item already exists

        // set some fields using the facade
        ItemDataMigrationFacade.SetVendorItemNo(ItemJson.VendItemNumber);
        ItemDataMigrationFacade.SetUnitVolume(ItemJson.Volume);
        ItemDataMigrationFacade.SetAlternativeItemNo(ItemJson.AltItemNumber);
        if ItemJson.PrimaryVendor <> '' then
            ItemDataMigrationFacade.SetVendorNo(ItemJson.PrimaryVendor);

        // migrate dependencies
        MigrateItemUnitOfMeasure(ItemDataMigrationFacade,ItemJson);

        // modify the item (+run trigger) to save the changes made by setters
        ItemDataMigrationFacade.ModifyItem(true);
        // update the status in the migration dashboard
        DataMigrationStatusFacade.IncrementMigratedRecordCount('My Migration Type',Database::Item,1);
    end;
end;

procedure MigrateItemUnitOfMeasure(ItemDataMigrationFacade : Codeunit "Item Data Migration Facade"; ItemJson : Text)
var
    MyUnitCodeStagingTable: Record "My Unit Code Staging Table";
    DataMigrationStatusFacade: Codeunit "Data Migration Status Facade";
    DescriptionToSet: Text[10];
    UnitCodeJson: Text;
begin
    if ItemJson.UnitCode = '' then
        // log an error using the Data migration façade
        DataMigrationStatusFacade.RegisterErrorNoStagingTablesCase(
            'My Migration Type',Database::Item,'Unit of measure is empty.');

    if ExternalWebService.GetUnitCode(ItemJson.UnitCode,UnitCodeJson) then
        DescriptionToSet := UnitCodeJson.Description;
    ItemDataMigrationFacade.CreateUnitOfMeasureIfNeeded(ItemJson.UnitCode, DescriptionToSet);

    // set the unit of measure on the item
    ItemDataMigrationFacade.SetBaseUnitOfMeasure(ItemJson.UnitCode);
end;
Figure 2: Example of Item and Item Unit of Measure migration without staging tables
Usage with staging tables:
The overall workflow is:
Integrate your extension in the Data Migration Wizard by subscribing to the events exposed by the Data Migration Façade.
From there, initialize the status of the migration so it can be displayed in the Data Migration Overview: “Data Migration Status Façade”.InitStatusLine(‘My Migration Type’,Database::Item,42000,Database::“My extension Staging table for items”,0).
You can either fill the staging tables from the wizard events, or in a subscriber to the event dedicated to filling staging tables (‘OnFillStagingTables’ in codeunit 6100): in this case, the import of data from the files to the staging tables will be done in the background.
Launch the migration: “Data Migration Façade”.StartMigration(‘My Migration Type’,false).
Subscribe to the events to migrate entities and their dependencies.
From the event subscribers, call the façade procedures to create entities and set their field values:
- “Item Data Migration Façade”.CreateItemIfNeeded(‘ITEM042’,‘My Item Description’;‘My Item Description 2’;ItemTypeToSet::Inventory)
- “Item Data Migration Façade”.SetBaseUnitOfMeasure(‘BOX’)
- “Item Data Migration Façade”.ModifyItem(true)
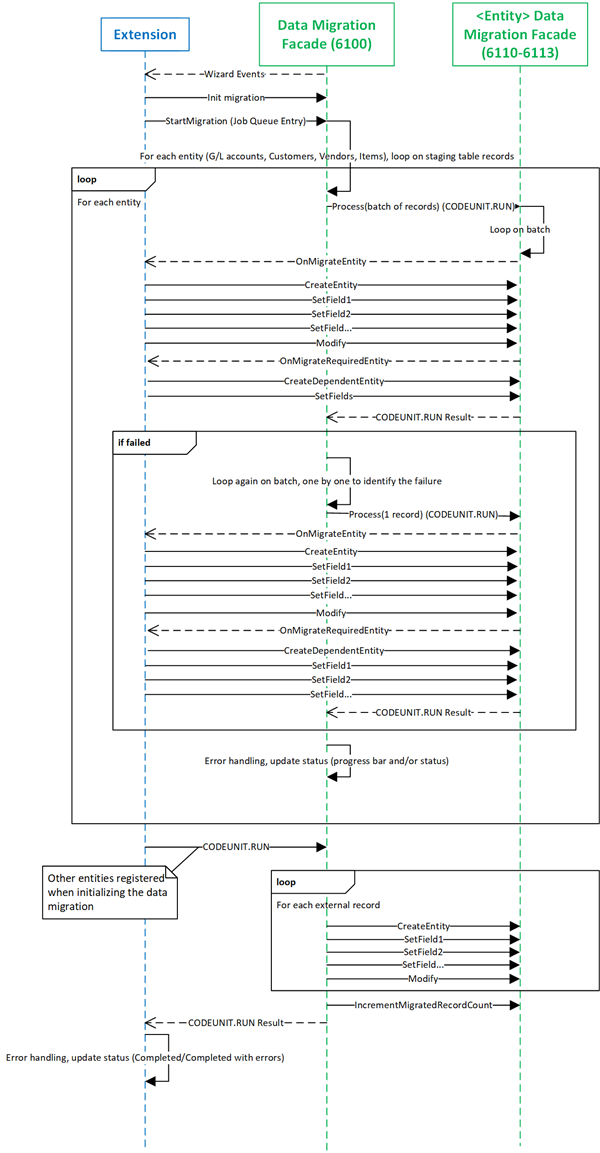
Figure 3: Simplified sequence diagram of the data migration with staging tables
Below is a simplified example showing how to create an item:
[EventSubscriber(ObjectType::Codeunit, Codeunit::"Item Data Migration Facade", 'OnMigrateItem', '', true, true)]
procedure OnMigrateItem(VAR Sender : Codeunit "Item Data Migration Facade";RecordIdToMigrate : RecordId)
var
    MyItemStagingTable : Record "My Item Staging Table";
begin
    // handle the event if it targets this extension's staging table
    if RecordIdToMigrate.TableNo <> Database::"My Item Staging Table" then
        exit;
    MyItemStagingTable.Get(RecordIdToMigrate);

    // create item using the facade
    if not Sender.CreateItemIfNeeded(MyItemStagingTable.ItemNumber,MyItemStagingTable.ItemName1,
        MyItemStagingTable.ItemName2,ConvertItemType(MyItemStagingTable.ItemType)) then
            exit; // item already exists

    // set some fields using the facade
    Sender.SetVendorItemNo(MyItemStagingTable.VendItemNumber);
    Sender.SetUnitVolume(MyItemStagingTable.Volume);
    Sender.SetAlternativeItemNo(MyItemStagingTable.AltItemNumber);
    if MyItemStagingTable.PrimaryVendor <> '' then
        Sender.SetVendorNo(MyItemStagingTable.PrimaryVendor);

    // modify the item (+run trigger) to save the changes made by setters
    Sender.ModifyItem(true);
end;
Figure 4: Example of event subscriber for Item migration
Below is another example showing how to use additional events to set fields that reference other tables, here the unit of measure:
[EventSubscriber(ObjectType::Codeunit, Codeunit::"Item Data Migration Facade", 'OnMigrateItemUnitOfMeasure', '', true, true)]
procedure OnMigrateItemUnitOfMeasure(VAR Sender : Codeunit "Item Data Migration Facade";RecordIdToMigrate : RecordId)
var
    MyItemStagingTable : Record "My Item Staging Table";
    MyUnitCodeStagingTable : Record "My Unit Code Staging Table";
    DescriptionToSet: Text[10];
begin
    // handle the event if it targets this extension's staging table
    if RecordIdToMigrate.TableNo <> Database::"My Item Staging Table" then
        exit;

    MyItemStagingTable.Get(RecordIdToMigrate);
    if MyItemStagingTable.UnitCode = '' then
        error('Unit of measure is empty.');
    MyUnitCodeStagingTable.SetRange(UnitCode,MyItemStagingTable.UnitCode);
    if MyUnitCodeStagingTable.FindFirst then
        DescriptionToSet := MyUnitCodeStagingTable.Description;

    // create the unit of measure through the facade
    Sender.CreateUnitOfMeasureIfNeeded(MyItemStagingTable.UnitCode, DescriptionToSet);

    // set the unit of measure on the item
    Sender.SetBaseUnitOfMeasure(MyItemStagingTable.UnitCode);

    // modify the item to save the changes made by setter
    Sender.ModifyItem(false);
end;
Figure 5: Example of event subscriber for Item Unit of Measure migration
Combining both approaches:
If you want to migrate additional entities, the Data Migration framework lets you initialize the migration with entities other than master data. In this case, the Data Migration Overview page will show additional lines. Item, vendor, customer, an general ledger accounts are migrated with an event driven approach, and the additional entities are migrated by calling an extension codeunit OnRun method.
Error handling with staging tables:
The migration starts by calling RUN on the façade codeunit. Errors thrown during the call are captured by GETLASTERRORTEXT and displayed when you choose the Show Errors action on the Data Migration Overview page.
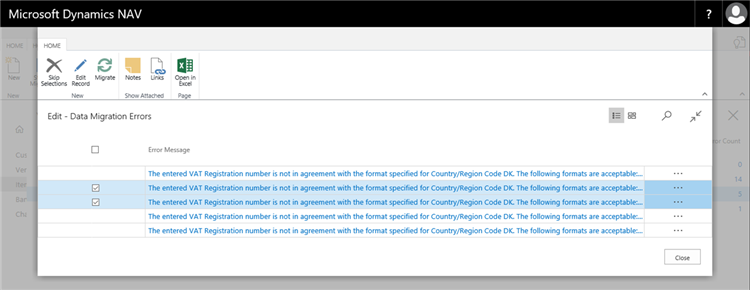
Figure 6: List of errors shown when clicking Show Errors on the Data Migration Overview page
The Edit Record action opens a view of the staging table, where you can edit fields to fix errors. Figure 4 shows an example of a page for the vendor staging table in a migration from C5.
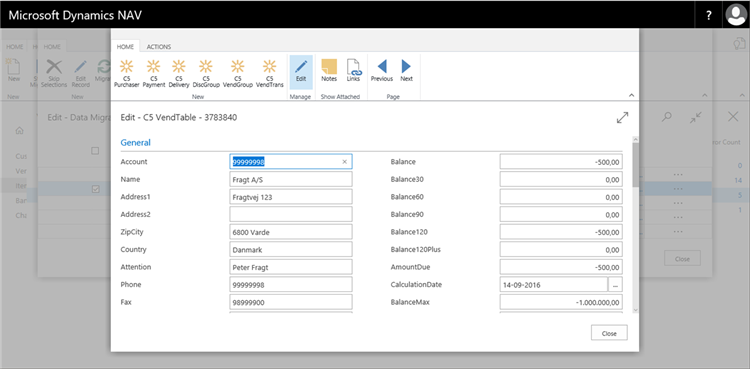
Figure 7: Edit a staging table record
The Staging Table ID determines the page to open, so it is important that the page ID is equal to the Staging Table ID, at least for the master data staging tables, for example, for G/L Accounts, Items, Customers and Vendor. You should ensure that pages to edit related entities are linked on this page by means of new actions. For example, Figure 4 uses the C5 Purchaser action.
After you fix the staging table record, you can choose the Migrate action to mark the selected records as records to retry, and then run StartMigration with the Retry flag set to true. This is the only place where the retry flag should be set to true in the StartMigration procedure.
Error handling without staging tables
When migrating data without staging tables, errors can be registered manually by the extension using DataMigrationStatusFacade.RegisterErrorNoStagingTablesCase. Otherwise they can be registered automatically if the codeunits fail when called on their OnRun procedure.
Errors will be displayed in the error list, but you cannot open and edit records because there is no staging table. The Edit action will not be available.
Limitations:
Data migration will fail if there are customers, vendors, items in the database and if these entities are selected for migration. For example, if you choose to migrate items and your company already contains items, you will get an error. This should not be an issue if you migrate your data from another tool to NAV, in which case you will most likely start on a fresh empty company. However, if you just want to import additional items to a company with existing items, then it is not supported by the framework. however, you can still use the different functions provided by the different codeunits (such as Item Data Migration Facade) to create the entities without strong coupling on the NAV data model.
G/L entries are deleted automatically.
There is no automated rollback in case of failure: data that is successfully migrated will be commited, and data that is not successfully migrated with be shown in the errors list. The retry feature (in case of staging tables) then makes it possible for you to retry individual entities or ignore them.
Usages in NAV:
The Data Migration Façade is available starting from version 2018.
The following Façade codeunits for data migration management are available:
COD6100 (Data Migration Facade)
COD6101 (Data Migration Status Facade)
The following Entity data migration façade codeunits are available:
COD6110 (GL Acc. Data Migration Facade)
COD6111 (Vendor Data Migration Facade)
COD6112 (Customer Data Migration Facade)
COD6113 (Item Data Migration Facade)
COD6114 (Ex. Rate Data Migration Facade)
References:
Façade pattern on Wikipedia: https://en.wikipedia.org/wiki/Facade_pattern
Feedback
Was this page helpful?
Glad to hear it! Please tell us how we can improve.
Sorry to hear that. Please tell us how we can improve.