In-context Notifications
Categories:
By Soumya Dutta at Microsoft Development Center Copenhagen
Context
Application developers need to raise a notification on events that are not blocking but do require attention from users. Notifications alert users to issues or information, and let them decide whether to react immediately or finish what they’re doing first.
Problem
Application developers have started to use system calls like CONFIRM or MESSAGE to alert or inform users about a condition. These calls interrupt users by displaying a window in the middle of the screen and forcing an immediate response.
Solution
Notifications display a message in a blue bar at the top of the workspace, as shown in Figure 1.
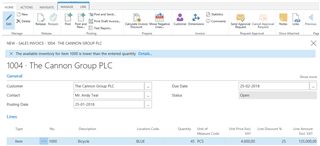
Figure 1 - Example of a notification
Notifications alert users to something they probably should act on, but can choose to ignore. For example, a notification might alert someone who is about to invoice a customer for inventory that isn’t available, as shown in Figure 1, but allow them to post the invoice anyway. This is different from an error that prevents someone from posting an invoice without specifying a required field.
In this example, if you choose Details a page opens to show the status of the inventory, as shown in Figure 2.
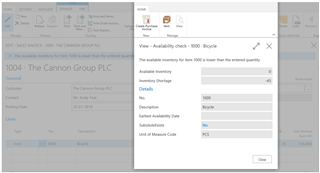
Figure 2 - Clicking an action in a notification
Raising a notification
The code in Figure 3 raises the notification in Figure 1.
COD 311: Item-Check Avail.
CreateAndSendNotification
AvailabilityCheckNotification.ID(GetItemAvailabilityNotificationId);
AvailabilityCheckNotification.MESSAGE(STRSUBSTNO(NotificationMsg,ItemNo));
AvailabilityCheckNotification.SCOPE(NOTIFICATIONSCOPE::LocalScope);
AvailabilityCheckNotification.ADDACTION(DetailsTxt,CODEUNIT::“Item-Check Avail.”,‘ShowNotificationDetails’);
ItemAvailabilityCheck.PopulateDataOnNotification(AvailabilityCheckNotification,ItemNo,UnitOfMeasureCode
,InventoryQty,GrossReq,ReservedReq,SchedRcpt,ReservedRcpt,CurrentQuantity,CurrentReservedQty,
TotalQuantity,EarliestAvailDate);
AvailabilityCheckNotification.SEND;
…
Figure 3 - Raising a notification
The first thing to note is that a new Notification DataType object has been introduced to C/SIDE.
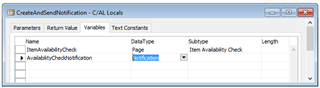
Figure 4. Notification is a new data type
In the code sample in Figure 3, the first line defines the scope. Currently , only the LocalScope is supported.
Identifying a notification
The ID is an optional parameter for the notification object that tracks the object in communications between the client and the server. Notifications have unique IDs that can be hard coded as GUIDs, as shown in Figure 5. A GUID can be generated using the CREATEGUID system function.
COD 311: Item-Check Avail.
GetItemAvailabilityNotificationId
EXIT(‘2712AD06-C48B-4C20-820E-347A60C9AD00’);
Figure 5. Uniquely identifying a notification
If the call to set ID is skipped, sending the notification creates a new notification with an ID that is generated at run-time instead of updating a notification that is already displayed (if present) with the ID.
Including messages notifications
Notifications should display a message. This message is set by an assignment call to the MESSAGE parameter of the notification object.
Invoking actions on notifications
Notifications can display action buttons, as shown in Figure 2 where a button named Details opens the inventory status for the item. To do that, when the button is clicked the ADDACTION method is invoked on the notification object using the following parameters:
- The text for the button.
- The code unit number that hosts the method to call.
- The name of the invoked method in the above code unit to call.
Figure shows the method that is called when the action is invoked- ShowNotificationDetails.
COD 311: Item-Check Avail.
ShowNotificationDetails
ItemAvailabilityCheck.InitializeFromNotification(AvailabilityCheckNotification);
ItemAvailabilityCheck.SetHeading(AvailabilityCheckNotification.MESSAGE);
ItemAvailabilityCheck.RUNMODAL;****
Figure 6 - Invoking an action
To show the inventory status using the Availability check page, certain parameters must be initialized. For example, the item number, the unit of measure code, and so on. This is done in the call to InitializeFromNotification method on the page. Figure 7 shows the code for this call.
Page 1872: Item Availability Check
InitializeFromNotification
GET(AvailabilityCheckNotification.GETDATA(‘ItemNo’));
SETRANGE(“No.",AvailabilityCheckNotification.GETDATA(‘ItemNo’));
EVALUATE(TotalQuantity,AvailabilityCheckNotification.GETDATA(‘TotalQuantity’));
EVALUATE(InventoryQty,AvailabilityCheckNotification.GETDATA(‘InventoryQty’));
CurrPage.AvailabilityCheckDetails.PAGE.SetUnitOfMeasureCode(
AvailabilityCheckNotification.GETDATA(‘UnitOfMeasureCode’));
Figure 7 - Fetching parameters from a notification object
Note how GETDATA uses a key to fetch values from the notification object, and how those values are used to initialize the page.
Notifications can include zero, one, or more than one action buttons. More than one action buttons result in multiple ADDACTION calls to the notification object.
Populating parameters on notifications
Actions use the values set on the notification objects. As shown in Figure 3 and Figure 7, the line that calls the method PopulateDataOnNotification does that. The result is shown in Figure 8.
Page 1872: Item Availability Check
PopulateDataOnNotification
AvailabilityCheckNotification.SETDATA(‘ItemNo’,ItemNo);
AvailabilityCheckNotification.SETDATA(‘UnitOfMeasureCode’,UnitOfMeasureCode);
AvailabilityCheckNotification.SETDATA(‘GrossReq’,FORMAT(GrossReq));
…
Figure 8 - Populating parameters on notifications
The invoked method must be stateless. Therefore, the context for creating the notification should be reproducible by using data that could be a part of the notification object. In this example, the SETDATA method on the notification object passes values for the item number, unit of measure code, and so on, as key value pairs.
Displaying the notification to the user
The last line in Figure 3 calls SEND to display the notification. If you know the ID of the notification, you can also call RECALL to hide it. However, avoid updating a displayed notification, for example by changing the message, by calling both RECALL and SEND. This makes two server–client calls. Instead, call only SEND. Calling SEND for a notification that is already displayed updates the notification.
Turning notifications on or off, and controlling when they are sent
By default, all notifications are turned on. However, you can specify the notifications you want to receive, and turn on or turn off some or all of them. For example, if you don’t want to be disturbed or are willing to accept the consequences of ignoring the message. This is unique to notifications.
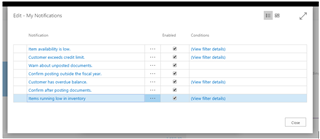
Figure 9 - The My Notifications page
Additionally, some notifications let you specify the conditions under which they are sent. For example, if you want to be notified when inventory is running low, but only for items you buy from a certain vendor.
- In the top right corner, choose the Search for Page or Report icon, enter my notifications, and then choose the related link.
- To turn on or turn off a notification, select or clear the Enabled check box.
- To specify conditions that trigger a notification, choose View filter details, and then fill in the fields.
The MyNotifications object determines whether notifications are turned on or off. Notifications are isolated from each other by the hard-coded GUID, as discussed in the section titled Identifying a notification. A fixed ID is essential to turning off a notification. The following are ways to achieve this.
- OnInitializingNotificationWithDefaultState is a published method on the MyNotifications page that is called when the enabled state of all the notifications is initialized.
Codeunit 311: Item-Check Avail.
OnInitializingNotificationWithDefaultState
MyNotifications.InsertDefaultWithTableNum(GetItemAvailabilityNotificationId,
ItemAvailabilityNotificationTxt,
ItemAvailabilityNotificationDescriptionTxt,
DATABASE::Item);
Figure 10 - Adding a notification to the My Notifications page
You must subscribe to this method and call either InsertDefault or InsertDefaultWithTableNum on the MyNotifications table. Both of these take the ID of the notification, a short description of the notification, and text that provides details about the conditions for the notification. The difference is that the InsertDefaultWithTableNum method takes an additional argument representing the table number if there is specific criteria for when to turn on a notification for a certain table. In this case, the notification can be enabled only for items that the criteria specified in the FilterPage. The FIlterPage is opened from the MyNotifications page.
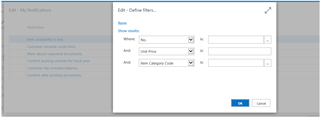
Figure 11 - Defining filter criteria to turn on a notification
- IsEnabled or IsEnabledForRecord are used to query if the notification is turned on. It may make sense to call this as early as possible in the condition checks, so you don’t make calculations that will not yield much if the notification is turned off. The second method takes the additional parameter that represents the record for which the enabled state is to be determined. In Figure 12, the check is for an item.
Codeunit 311: Item-Check Avail.
IsItemAvailabilityNotificationEnabled
EXIT(MyNotifications.IsEnabledForRecord(GetItemAvailabilityNotificationId,Item));
Figure 12 - Checking whether notifications are turned on
You may check that the call to this function is made almost as the first step in checking for availability.
- OnStateChanged event should be subscribed to if the developer needs to do something additional when changing the state of a notification, such as turn on another notification.
The ability to turn notifications on or off is not required. If skipped, the notification is always shown when the condition that triggers it is met, and a user cannot turn it off.
NAV specific usages
For examples of how these objects are used in Dynamics NAV, look at the code for the following objects:
- Codeunit 1802 Data Migration Notifier
- Codeunit 311 Item-Check Avail.
- Codeunit 312 Cust-Check Cr. Limit
- Codeunit 1854 Item Sales Forecast Notifier (in SalesAndInventoryForecast extension)
- Codeunit 1852 Item Sales Forecast Scheduler (in SalesAndInventoryForecast extension)
Best practices
The following list summarizes best practices for creating notifications:
- Do not set data on the notification that you will not use in the method invoked from the action button.
- Ensure that the MyNotifications table is accessed only as described above, and that the correct pairs of calls are made. For example, InsertDefault…IsEnabled and InsertDefaultWithTableNum …IsEnabledForRecord.
- Do not call RECALL before SEND in a server call-back if you need to update a notification that is already displayed. Instead, call only SEND to update the notification. This reduces traffic on the network.
- Ensure that the method specified on the ADDACTION method for the notification is (a) exists, (b) is global and (c) follows the signature described above.
Feedback
Was this page helpful?
Glad to hear it! Please tell us how we can improve.
Sorry to hear that. Please tell us how we can improve.